Create a RESTful API with NodeJS and Express.

API stands for Application Programming Interface and it refers to a set of protocols that permit interaction between applications. With APIs, certain resources can be made available to clients without exposing the data source and backend implementation.
In this article, we will learn how to create a feature-complete RESTful service using NodeJS and Express. We will also look at defining api endpoints, data models, services and middlewares.
Prerequisites:
To follow through with this guide, you’ll need:
Node.Js installed on your machine. NodeJS is an open source asynchronous event-driven Javascript runtime environment that runs on various platforms and allows Javascript developers to run Javascript on the server. Head over to NodeJS Download and install Node.js for your operating system, preferably the stable version. After installation, go ahead and type
node -vto confirm that Node installed successfully on your machine and the version installed.Knowledge of coding with an IDE. I’ll be using Visual Studio Code VsCode for this tutorial but feel free to use any IDE of your choice.
Access to a MySQL instance either running locally or remotely.
Before we get started, I will recommend you check out this article on The abc's of building an API for a refresher and an in-depth understanding of API concepts, including various API architectures.
Getting Started
To build out this tutorial and cover CRUD operations, we will be creating a Recipe Review API where you can upload your favourite food recipe, update, delete and search for new recipes.
Step 1: Scaffold a new Node project
An express application can be scaffolded by either manually initializing the app and installing needed dependencies or by using the express-generator plugin. In this tutorial, we'll opt for the first method as it is basic and simpler. For a guide on how to use the second method, check Express application generator.
Start by creating a project directory on your computer and cd into that folder. Fire up your terminal and enter the following commands:
mkdir recipe-service && cd recipe-service
Next, we create a package.json file by initialising a Node project with default settings. We will use this file to keep track of our project dependencies and define scripts for serving and testing our project. A typical Express application contains a package.json file and one or more .js/.ts files. A package.json file must be an actual JSON with some properties. This properties include name of the application, version number of the application, description of the application, main which acts as entry point for the application, scripts for defining set of repetitive tasks, dependencies, and devDependencies amongst others.
npm init —yes
Step 2: Install Project Dependencies
We need to install necessary modules that our project will depend on. Run the following command:
npm i express mysql-query-util dotenv joi
npm i -D nodemon
If you open up your package.json file now, you'll see the above packages listed as dependencies and devDependencies respectively.
Let’s take a closer look at each of the installed packages.

- Express: Express is a really cool, fast, minimalistic and popular web framework for Node.js that provides a robust set of features for creating applications.
- mysql-query-util: A simple and light-weight utility module for mysql and nodejs. It is basically a promise wrapper around mysql.
- dotenv: Zero-dependency module that loads environment variables from a .env file into process.env.
- joi: A powerful schema description language and data validator for JavaScript.
- nodemon: Nodemon helps to watch and automatically restart our application when file changes are detected.
Note, the - D flag as used in the second command is the same as
—save-dev.It saves the installed package as a development dependency.
Step 3. Update package.json file.
Edit the package.json file to look like this:
{
    "name": "recipe-service",
    "version": "1.0.0",
    "description": "A recipe review api service",
    "main": "index.js",
    "scripts": {
        "start": "nodemon index.js"
    },
    "keywords": [
        "Recipe",
        "Review"
    ],
    "author": "Uchenna Emeruche",
    "license": "ISC",
    "devDependencies": {
        "nodemon": "^2.0.7"
    },
    "dependencies": {
        "cors": "^2.8.5",
        "dotenv": "^8.2.0",
        "express": "^4.17.1",
        "joi": "^17.3.0",
        "mysql-query-util": "^1.1.0"
    }
}
So we can now serve our project by typing npm run start.
Step 4: Create .env file and define our folder structure:
We will use the .env file to manage our environment variables at different stages. These variables are loaded using the dotenv module that we have already installed.
touch .env
PORT=4000
DB_HOST=localhost
DB_USER=your_dbuser
DB_PASSWORD=your_dbpassword
DB_NAME=recipe_db
connectionLimit=25
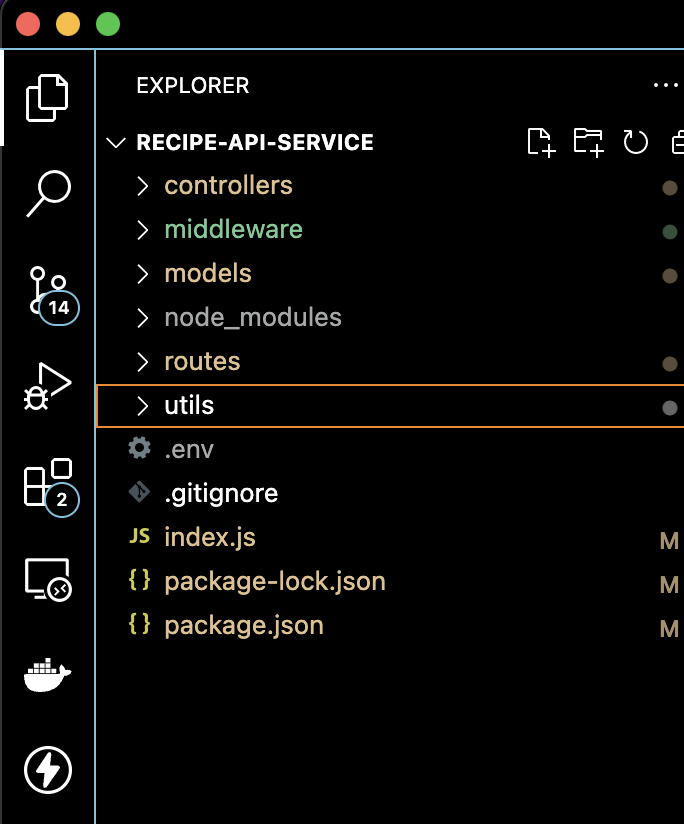
Next, Let’s define the full directory structure of our application by creating the following sub-folders.
mkdir controllers middleware models routes utils
At this point, our folder structure should look like this:
Step 5: Setup Express Web Server
Create an index.js file in the root directory and add the following code. This file will be the entry point of our express application.
touch index.js
// index.js
const express = require("express");
const app = express();

const PORT = process.env.PORT || 5000;

app.listen(PORT, () => {
    console.log(`Server is running on PORT:  ${PORT}`);
});
Congratulations!!!!, You have successfully created your first express application that does absolutely nothing😂. Just kidding,
Let's build on the above code to add more flesh to our application.
// index.js
// Import packages
const express = require("express");
const dotenv = require("dotenv");
const cors = require("cors");

dotenv.config();

/*
Instantiate an express app and use 5000 as default PORT if process.env.PORT is not set.
*/
const app = express();
const PORT = process.env.PORT || 5000;

/*
Set up logger function.
For a production-ready application, you probably will setup logging differently.
*/
app.use((req, res, next) => {
    res.on("finish", () => {
        console.log(
            `You received a [${req.method}] of [${res.statusCode}] from [${req.socket.remoteAddress}]`
        );
    });
    next();
});

/*
Set up middleware functions
*/
app.use(express.urlencoded({ extended: false }));
app.use(express.json());

// Enable Cross-Origin Resource Sharing - CORS
app.use(cors()); // pre-flight requests are already handled for all routes

/*
Define APi Routes
*/
app.get('/', (req, res, next) => {
    return res.json({
        msg: "Welcome to our Recipe service"
    })
})

/*
Define Error Handling middleware for unknown routes

*/

app.listen(PORT, () => {
    console.log(`Server is running on PORT: ${PORT}`);
});
Now, that’s a lot of code. Let’s go over it together.
First, we import express package and initialize a new express application. Also we import dotenv so as to read the content of our .env file.
Next, we define Application-level middlewares.
Middlewares are functions that have access to the request object(req), the response object(res), and the next middleware function in the app's request-response cycle. Express maintains a middleware stack which comprises of series of middleware function calls. These middlewares are executed from top to bottom. Each middleware that does not end the request-response cycle is expected to call next() callback in order to pass control to the next function in the pipeline.
Read more about express middlewares here.. https://expressjs.com/en/guide/using-middleware.html
Next, we setup middleware function to log our requests and responses(for testing and easy debugging).
Also, we hooked up express.urlencoded() and express.json() to parse incoming requests with URL-enconded and JSON payloads respectively.
Then there is app-level cors() handler to handle cross-site requests. Note that you can enable cors on the route-level instead of defining it as an app-level middleware.
After that we create the root route of our application that returns a welcome message.
Next, we define a middleware for handling 404 routes.
Note how we placed the errorHandler - app.use(errorHandler) middleware after other middlewares. This is because unhandled errors thrown in other middlewares will be handled by this guy.
- Finally, we set our application to listen to port 4000. The app.listen method accepts a callback function. In our case, we are just logging the PORT to the console.
Let's now run our app and visit http://localhost:4000
$ npm run start
Server is running on PORT: 4000
Step 6: Create Custom Error class and Define Error Handlers
Let's go ahead and create a file named error_handler.js under middleware directory and add the following code to the just created file.
const errorHandler = (error, req, res, next) => {
  let { statusCode = 500, message, data = null } = error;
  message = statusCode === 500 || !message ? "Internal Server Error" : message;
  error = {
    status: "error",
    message,
    ...data,
  };
  return res.status(statusCode).json(error);
};

class HttpException extends Error {
  constructor(statusCode, message, data) {
    super(message);
    this.statusCode = statusCode;
    this.message = message;
    this.data = data;
  }
}

module.exports = { HttpException, errorHandler };
In the above snippet, we created a custom error called HttpException class that extends the base Error class. This is so that we can use a uniform error object (errors having the same shape) across our app.
We also created an error-handling middleware. Error-handling plainly refers to how errors that occur in our app both synchronously and asynchronously can be caught and processed. In Express, we define error-handling middleware functions in the same way as other middleware functions, except that we pass four arguments to the former instead of three, specifically with the signature(error, req, res, next)).
Error-handling middlewares always take four arguments. You must provide four arguments for Express to identify it as an error-handling middleware function. Even if you don’t need to use the next object, you must specify it to maintain the signature.
Let's now update the index.js file: import the above error_handler file and define our 404 routes and error handling middleware.
// index.js
// import packages
...
const { HttpException, errorHandler } = require("./middleware/error_handler");

.
.
.

/*
Define Error Handling middleware for unknown routes

*/
app.use((req, res, next) => {
    next(new HttpException(404, "OOps, you hit an unavailable route"));
});

app.use(errorHandler);
.
.
.
Step 7 Database Configurations.
For this example, we will use a package called mysql-query-util to manage interaction with our database. The mysql-query-util is a simple and light-weight utility module for mysql and nodejs Read more here. Essentially, it creates a level of abstraction that let us construct and run mysql queries in a more declarative way just like most non-sql DBMS. I chose this package because:
- Well, I am too lazy to directly create and manage connections using the mysql2 package 😂.
- ORMs will be an over-kill for this project. Whereas you can use any ORM or DBMS of your choice, I'll recommend this package for not-so-complex projects. At this point, make sure you have access to a running mysql instance either locally on your computer, hosted on a server or running in a docker container. Enough of the small talks, let's get to work.
Create MySQL Database and Table
We can create our database and table using a visual database too or GUI like MySQL Workbench but I prefer to code it out because it helps to keep all our codes in one place. More so, the mysql-query-util package has an api that makes it very easy to run raw sql queries.
Method 1:
- Open a Visual Database Design Tool of your choice (e.g. MySQL workbench) and create a database called recipe_db after connecting to the running mysql instance.
- Create a table called recipes with the following fields:
        id INT AUTO_INCREMENT PRIMARY KEY,
        name VARCHAR(100) NOT NULL,
        description VARCHAR(255),
        likes INT(10),
        createdBy VARCHAR(100) NOT NULL,
        createdAt DATETIME NOT NULL DEFAULT CURRENT_TIMESTAMP
Method 2: in the utils folder, create a file named database.js and add the following code snippet
//  utils/database.js

const mysqlUtil = require("mysql-query-util");

const DbConfig = async() =>{
    mysqlUtil.setConnection({
        host: process.env.DB_HOST,
        user: process.env.DB_USER,
        password: process.env.DB_PASSWORD,
        connectionLimit: process.env.connectionLimit
    });

   try {
    // Create Database and Table using the rawQuery method
     await mysqlUtil.rawQuery(`CREATE DATABASE IF NOT EXISTS recipe_db`)

     await mysqlUtil.rawQuery(`CREATE TABLE IF NOT EXISTS recipe_db.recipes(
            id INT AUTO_INCREMENT PRIMARY KEY,
            name VARCHAR(100) NOT NULL,
            description VARCHAR(255),
            likes INT(10),
            createdAt DATETIME NOT NULL DEFAULT CURRENT_TIMESTAMP)`
        )
   } catch (error) {
    console.log(err)
    return err
   }
}

module.exports = DbConfig
In the above snippet, we first imported the package and assigned it to a variable. Next, we call the setConnection method of the mysql package to initialise a connection for running subsequent queries.
Using the rawQuery method of the mysql-query-util package we can now pass in raw queries to create a database as well as a table. Note that the rawQuery method is asynchronous.
Step 8: Defining Models
Create a file called recipe.js in the models folder and add the code below:
// models/recipe.js

const mysqlUtil = require("mysql-query-util");

mysqlUtil.setConnection({
    host: process.env.DB_HOST,
    user: process.env.DB_USER,
    password: process.env.DB_PASSWORD,
    database: process.env.DB_NAME,
    connectionLimit: process.env.connectionLimit
});

class Recipe {
    tblName = 'recipes'

    async findAll() {
        return await mysqlUtil.select(this.tblName);
    };
    async findOne(data) {
        let { params, fields } = data;
        return await mysqlUtil.select({
            tableName: this.tblName,
            fields: fields ? fields : '*',
            params: params ? params : ''
        });
    }
    async create(data) {
        const result = await mysqlUtil.insert(this.tblName, data);
        const affectedRows = result ? result.affectedRows : 0;
        return [{
            affectedRows,
            message: "New recipe created"
        }];
    }

    async update(params, data) {
        const result = await mysqlUtil.update(this.tblName, data, params);
        return [{
            affectedRows: result ? result.affectedRows : 0,
            message: "Recipe updated successfully"
        }];
    }
    async delete(params) {
        const result = await mysqlUtil.delete(this.tblName, params);
        return [{
            affectedRows: result ? result.affectedRows : 0,
            message: "Recipe deleted successfully"
        }];
    }
}


module.exports = new Recipe;
The Recipe model is a class with one attribute(table name) and few methods. Each method handles one CRUD operation.
- The first method is the findAll method that uses the select method of the mysql-query-util package to return all recipes in our database table.
- The second method, findOne uses the same select method but returns only recipes that meets a certain criteria. This filter is passed as params to the select method. Check out the github repo for more examples on how to filter queries with mysql-query-util.
- The third method, create uses the insert method to insert a new record to the database. The insert method accepts a key-value pair with the key representing the column name in the database table and the value, the record to be inserted.
- The fourth method updates a recipe using the update method of the mysql-query-util.
- Finally, we use the delete method to delete a recipe from the database.
Step 9: Input Validation
We will use joi module to validate our data at the request level. This module validates the data based on schemas. Visit JOI Data Validation for details about the module. Create a file named input_validator.js under the utils folder and add the following code:
const joi = require("joi");

exports.createRecipeSchema = joi.object({
    name: joi.string().required(),
    createdBy: joi.string().required(),
    description: joi.string().required(),
    likes: joi.number(),
});

exports.updateRecipeSchema = joi.object({
    name: joi.string().optional(),
    createdBy: joi.string().optional(),
    description: joi.string().optional(),
    likes: joi.number().optional(),
})
In the above snippet, we created two data validation schemas for creating and updating recipes. Whereas we can use one schema for both operations since they are of the same shape, we will work with separate schemas in this tutorial to keep things simple.
Step 10: Create Controllers
It makes no sense to create a model if there are no controllers to use it. Let's create a new file named recipe.js under the controllers directory and add the following code. We will define our route controllers in this file.
const Joi = require("joi");
const Recipe = require("../models/recipe");
const { HttpException } = require('../middleware/error_handler');
const { createRecipeSchema, updateRecipeSchema } = require('../utils/input_validator');

const getRecipes = async(req, res, next) => {
    const recipes = await Recipe.findAll();
    sendResponse(res, recipes);
};
In the first section of the snippet, we imported the model we created in the previous step, the custom Error Handler we created earlier and some validation Schemas.
Next, we start defining our controllers. Controllers in Express are middleware functions that have access to the request object(req), the response object(res) and the next middleware function in the application’s request-response cycle.
With middleware functions, we can execute any code, make changes to the request and the response objects, call the next middleware function in the stack and end the request-response cycle. Head over to Using Express middleware functions to learn more.
The first controller(function) is the getRecipes controller which returns all the existing food recipes from the database. It is asynchronous because reading from the database might take some time. Also, note how we referenced the findAll() method of the Recipe Model. Finally we called the sendResponse function to return the response back to the caller.
At this point, our API is beginning to take shape. Let's define the remaining route controllers. Paste the below code after the getRecipes function
// controllers/recipe.js
...
const searchRecipe = async(req, res, next) => {
    checkValidation(Joi.object({
        search: Joi.string().min(3).required()
    }).validate(req.body))

    const { search } = req.body;
    const result = await Recipe.findOne({
        params: [
            ["title", "like", `%${search}%`],
            ["OR", "content", "like", `%${search}%`]
        ]
    });
    sendResponse(res, result);
};
const getRecipeById = async(req, res, next) => {
    checkValidation(Joi.object({
        id: Joi.string().required()
    }).validate(req.params))

    const id = req.params.id;
    const recipe = await Recipe.findOne({
        fields: ["title", "content"],
        params: [
            ["id", "=", id]
        ]
    });
    sendResponse(res, recipe);
};
const addRecipe = async(req, res, next) => {
    checkValidation(createRecipeSchema.validate(req.body));
    const result = await Recipe.create(req.body);
    sendResponse(res, result, "Could not create recipe, please try again");

};
const updateRecipe = async(req, res, next) => {
    const params = [
        ["id", "=", req.params.id]
    ];
    checkValidation(updateRecipeSchema.validate(req.body));
    const result = await Recipe.update(params, req.body);
    sendResponse(res, result, "Could not update recipe, please try again");
}

const deleteRecipe = async(req, res, next) => {
    const params = [
        ["id", "=", req.params.id]
    ];
    const result = await Recipe.delete(params);
    sendResponse(res, result, "Recipe deleted");
}

const checkValidation = (schema) => {
    const { error, value } = schema;
    if (error) {
        throw new HttpException(400, 'Validation failed', error);
    }
}

const sendResponse = (res, data, error_msg = "No available recipe with the given criteria!") => {
    if (data.errorno) throw new HttpException(500, data)
    if (!data.length) throw new HttpException(404, error_msg);
    return res.status(200).json({
        data,
    });
}

module.exports = {
    getRecipes,
    searchRecipe,
    getRecipeById,
    addRecipe,
    updateRecipe,
    deleteRecipe,
};
Okay!!!, that's a lot of code. Perhaps a closer look at each function will go a long way.
- The first function is the searchRecipe controller that takes a searchCriteria and returns recipes that match the given criteria. Notice the use of checkValidation function to validate the input. The checkValidation function takes in a Joi Schema, validates the schema and returns an error if the validation fails. Else, transfers control to the next function statement.
- Each controller calls one or more of the models created earlier. For example, the searchRecipe controller calls the findOne model just as the addRecipe controller calls the create model. etc.
- Each controller uses the sendResponse function to return response to the caller.
Step 11: Create A Routing System.
If you try to run the webserver again at this point, you will get another error:
Error: Cannot find module: ''./routes/api"
Inside the routes directory, create a file named api.js and paste the code below:
const router = require("express").Router();

const { getRecipes, addRecipe, searchRecipe, getRecipeById, updateRecipe, deleteRecipe } = require("../controllers/recipe");
const parseRequest = require("../middleware/promise_handler");

router.route('/')
    .get(parseRequest(getRecipes))
    .post(parseRequest(addRecipe))
router.route('/:id')
    .get(parseRequest(getRecipeById))
    .put(parseRequest(updateRecipe))
    .delete(parseRequest(deleteRecipe))
router.post('/search', parseRequest(searchRecipe))

module.exports = router;
In the above code snippet, we created a router instance from the express.Router class. This router instance will serve as our routing system which we will mount in the main entry point(index.js). You can Read all about Express Routers here
Next, we import the controllers for different routes as well as a request parser module.
Using the router instance, we define different routes and assign a controller to each route.
Typically, we define express routes using methods of the Express app object that corresponds to HTTP methods; for example, app.get() to handle GET requests and app.post to handle POST requests. See Express app methods For a full list of HTTP methods. The routing methods specify a handler function that is triggered when the application receives a request to the specified route with a matching HTTP method. Essentially, the application “listens” for requests that match the specified route(s) and method(s), and if a match is detected, it calls the specified callback function.
Notice the use of router.route(' ') to create chainable route handlers for a route path. This comes in handy when you have different route methods for a single route path.
- The request parser module is a middleware that takes in a request's callback and returns a promise.
Step 12: Bringing it all together
So far we've been able to build the different parts of our API, it's time to connect the dots together. Head over to your index.js and update it as follows. Here is what my final code looks like.
//index.js

// Import packages
const express = require("express");
require("dotenv").config();
const cors = require("cors");
const { HttpException, errorHandler } = require("./middleware/error_handler");
const DbConfig = require("./utils/database");

(async() =>{

/*
 Setup MySQL Database and table
*/
await DbConfig()

/*
Instantiate an express app and use PORT 4000 if process.env.PORT is not set.
*/
const app = express();
const PORT = process.env.PORT || 4000;

/*
Set up logger function
For a production-ready application, you probably will setup logging differently.
*/
app.use((req, res, next) => {
    res.on("finish", () => {
        console.log(
            `You received a [${req.method}] of [${res.statusCode}] from [${req.socket.remoteAddress}]`
        );
    });
    next();
});

/*
Set up middleware functions
*/
app.use(express.urlencoded({ extended: false }));
app.use(express.json());

// Enable Cross-Origin Resource Sharing - CORS
app.use(cors()); // pre-flight requests are already handled for all routes

/*
Define APi Routes
*/
app.get('/', (req, res, next) => {
    return res.json({
        msg: "Welcome to our Recipe service"
    })
})
app.use("/api/recipes", require("./routes/api"));

/*
Define Error Handling middleware for unknown routes
*/
app.use((req, res, next) => {
    next(new HttpException(404, "OOps, you hit an unavailable route"));
});

app.use(errorHandler);

app.listen(PORT, () => {
    console.log("Server is running on PORT: ", PORT);
});
})()
In the above code snippet, we wrapped our code in an IIFE (Immediately Invoked Function Expression) to await the database setup before running the rest of the code.
Testing
If you've followed through to this point, you most likely have an API with untested endpoints. We need to make sure that we can add our favourite recipe to the database, fetch existing recipes as well as update and delete entries.
In a production-ready project, you definitely will write unit tests, integration tests and create a pipeline to automate the process. To keep things simple, we will test our project manually using a Rest API Client. I'll use Thunder Client - a lightweight Rest API Client Extension for Visual Studio Code since I'm working with Vs Code but feel free to use your preferred Rest Client (Insomnia, Postman etc).
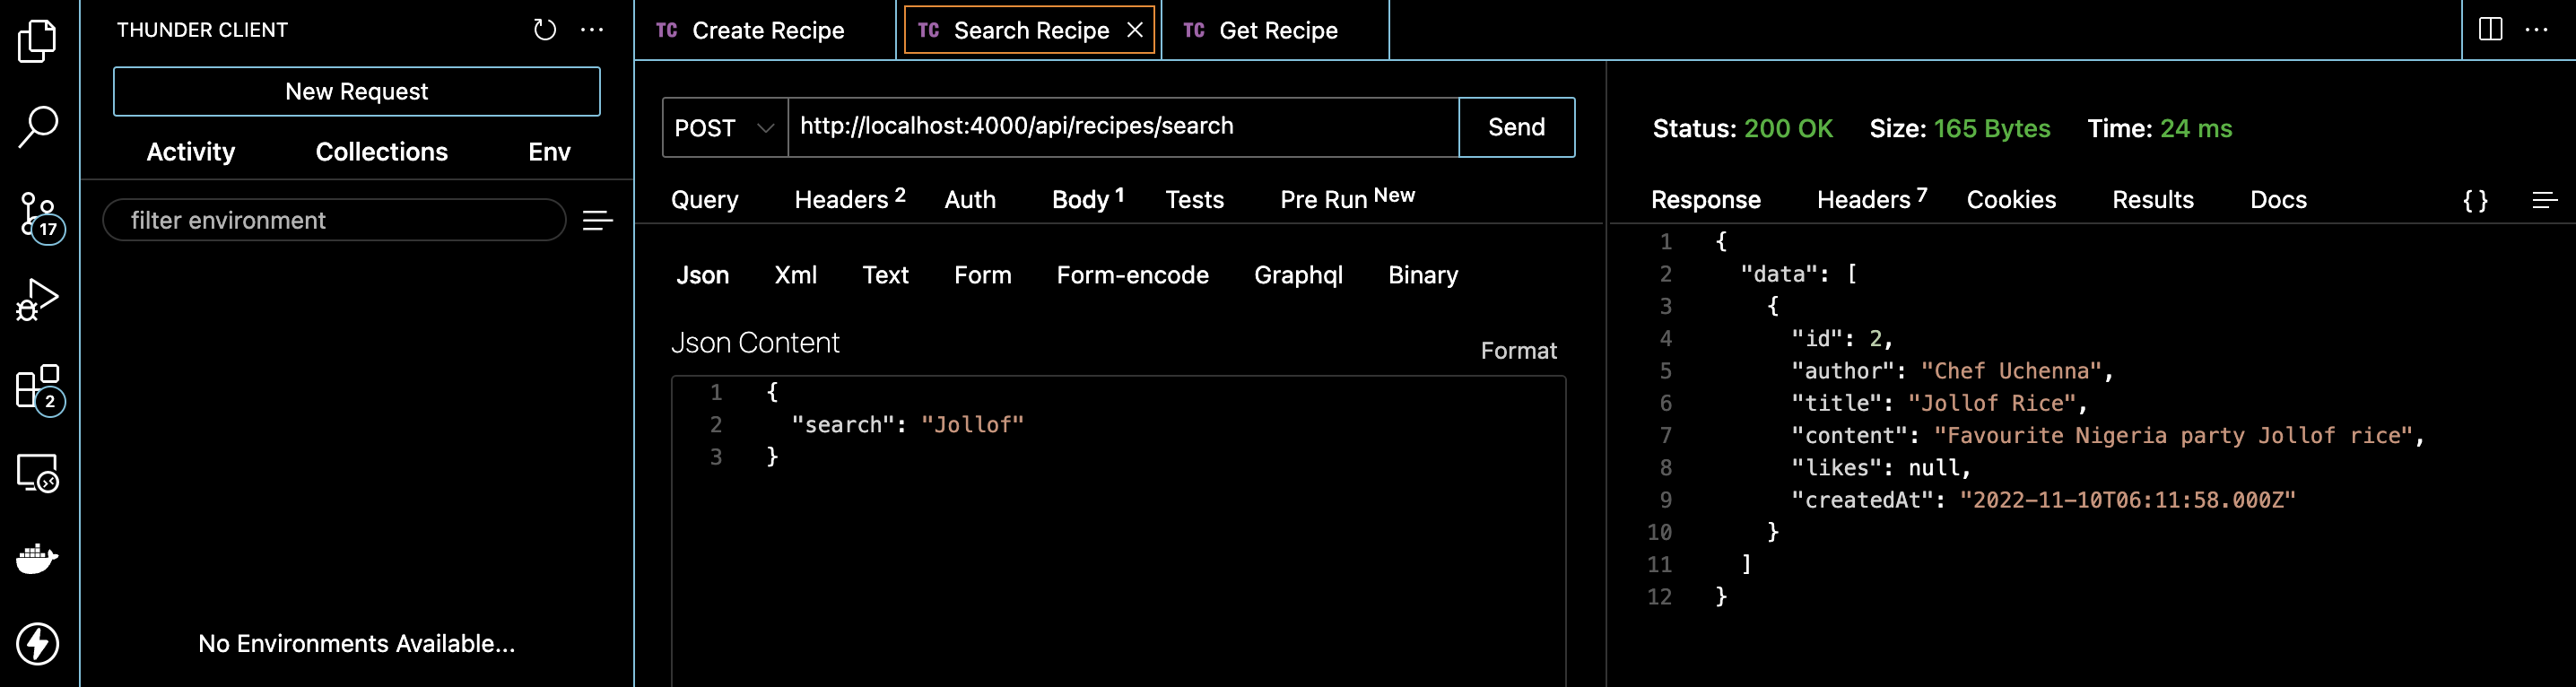
- Create a recipe
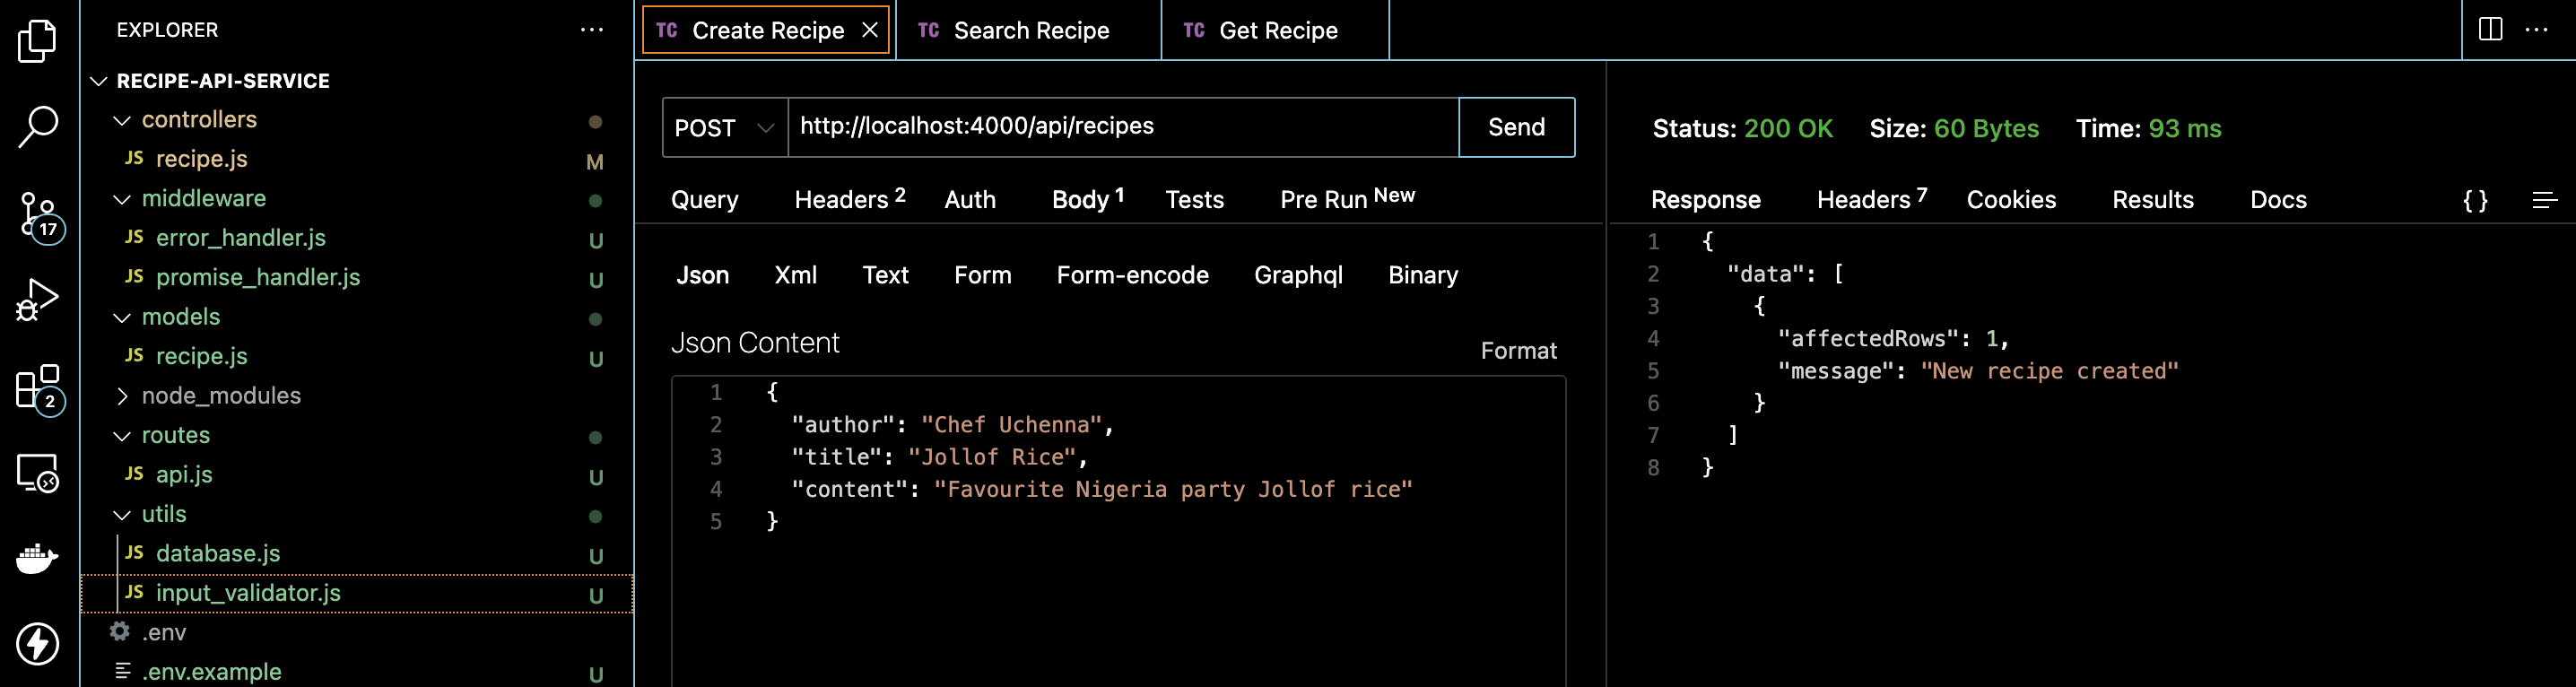
- Fetch recipes
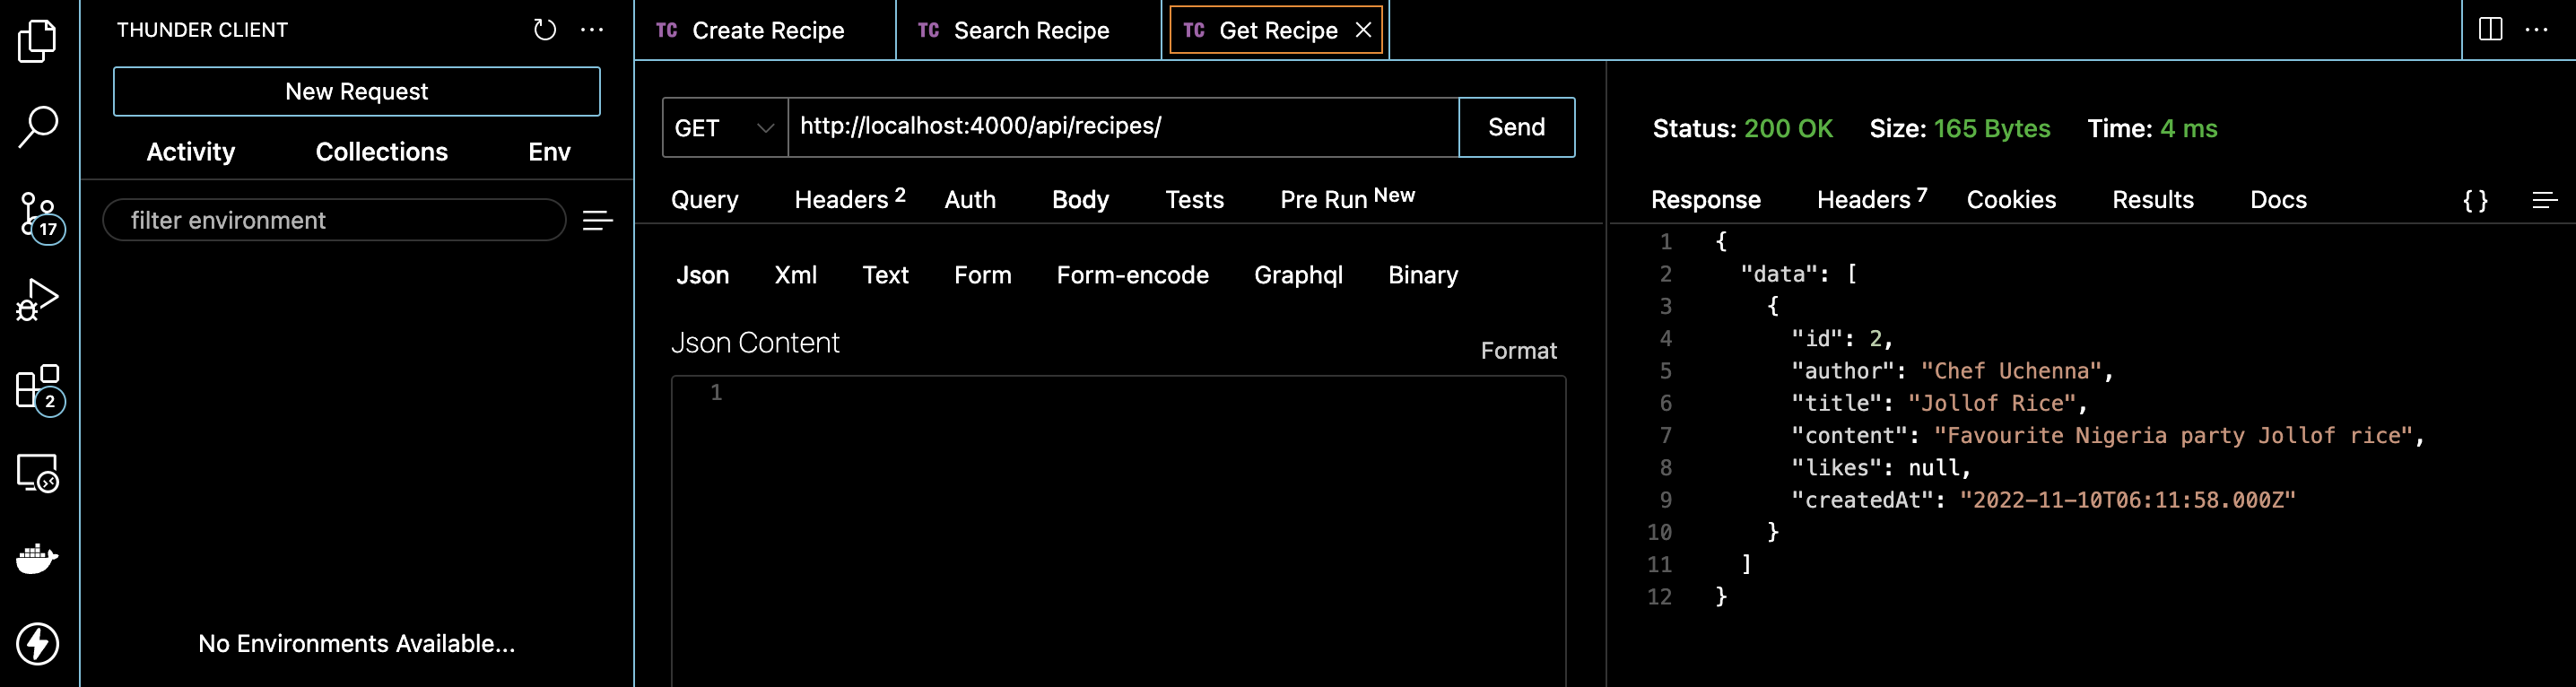
- Search for a recipe
The Express framework provides a robust set of features for building RESTful APIs. Coupled with other packages, setting up an API can be as easy as writing few lines of code. It can equally get complex depending on the project and the requirements.
⭐️ Feel free to fork or clone this repo on Github if you'd like to play with the source code.
Thanks and happy reading.


